Tips and techniques for polishing with Dynabrade compounds and pads / foams
Reach the perfect finish applying the Dynabrade process
HOW AND WHEN SHOULD THE POLISHING PADS BE CLEANED?
If the pad begins to dust or stick during polishing, it is time to clean and remove the accumulated dirt and used polish from it. After polishing, all pads can be washed with water and a little cleaning agent. Note that lambskin pads should be left wet and re-attached to the hook face of polishing plate in order to prevent them from shrinking and losing their shape.
THE POLISH OFTEN SPLATTERS WHEN I USE THE POLISHER. WHAT AM I DOING WRONG?
This can be caused by various reasons:
- The polisher is turned on before bringing the pad into contact with the paint (frequent beginner’s error)
- Polisher speed too high
- Too much polish
- Tilting of polisher / formation of dust when polishing edges
- Use of new pad that has not yet been worn in
- Fresh pad, into which the polishing compound has not been distributed evenly prior to polishing
CONSIDERATIONS WHEN USING A NEW POLISHING PAD
- Make sure that the entire surface of each new pad is coated sparingly and evenly with the required polish. (Note: Any part of the pad that is not coated with polish may cause micro-scratches.)
- The rubbing compound should be spread across several points onto the paint surface with the pad and then distributed evenly and rubbed in (BEFORE TURNING ON THE POLISHER). The aim is to have sufficient unused rubbing compound over the entire surface in order to ensure a uniform cut.
- Now set the polisher/pad onto the paint surface and check whether you have set the polisher to the right speed.
- Always START the polisher ON the surface and STOP the polisher OFF the surface.
- The actual polishing process can now begin. Switch on the polisher.
IMPORTANT: you do not need to exert heavy downward force to keep the Backing Pad and abrasive flat on the surface.
- Make sure that the area of the surface you wish to work on is not too large.
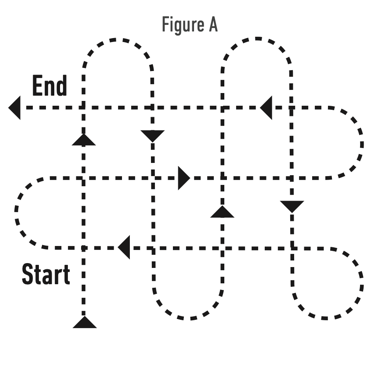
Always remember: you should be able to cover the selected surface from one comfortable position. Do not reach or extend beyond a comfortable range. You want to be able to keep uniform pressure across the entire area being polished. A 50 x 50 cm area is a common size to work at one time - Follow a set pattern when buffing. It is suggested to pass over the surface, following a criss-cross “North, South, East, West” pattern, overlapping each pass by 50% of the diameter of the pad.
(see diagram below) This ensures that a uniform finish is achieved. (See Figure A)
Check your progress and completely clean the surface with new microfiber towel. Wipe in a straight motion (not circular) to be able to detect any areas that might need additional work. If any defects are noticed, reapply compound to the pad and continue in that area until the surface if free of all defects. Always clear away and completely remove any polishing compound residues before progressing to the next area or polishing step. Do not use the same microfiber towel for different grades of compound.
Our product Selection:
- Dynared 1L - Ref. 22017
- Dynaorange 1L - Ref. 22021
- Dynateal 1L - Ref. 22011
- Dynablue 1L - Ref. 23040
- Dynabrade Polishing Pads & Foams